|
|
 |
User Rating:   / 2 / 2
- Details
-
Published on Monday, 26 December 2016 22:08
-
Hits: 7727
{jcomments off}Do you have questions about the tool WinLED? On this page you will get helpful answers to frequently asked questions.
- The system tray icon of the WinLED is no longer displayed. Why?
A common reason is that Windows after some time hides the icons of rarely used applications in the notification area. If you still want to keep the WinLED status in mind, in tis guide you will learn how to configure Windows to display all Windows icons again.
In particular, Windows 10 sometimes rejects the display of the icon in the notification area, without specifying reasons. However, the appearance of the WinLED icon will work normally after restarting the operating system.
- The WinLED icon is displayed but does not signal any activities. Why?
I myself have done this after the installation of the Windows Anniversary update: The WinLED display remained despite activities always black. The Anniversary Update had changed the registry settings, which WinLED per drive notes that activities should be displayed. The problem is easy to solve: Please click on the context menu of WinLED and on the menu then on the relevant drive to reactivate the display of the activities for this drive.
- The WinLED Icon is always hidden in the notification area, even though a permanent display has been configured in Windows. Why?
Windows has stored several registries of WinLED in the notification area's cache and has not used the registration of WinLED, which had changed to permanent settings. You can see this in the system control under "Notification Area Icons". If there several entries of WinLED are displayed, these are duplicate registrations of WinLED.
You can use this small batch program to refresh the Notification Icon Cache on the affected computer. The batch program first kills all Windows Explorer instances (the Windows taskbar disappears), then deletes the cache in the registry and restarts Windows Explorer (the tasklist appears again). With start, the Notification Area Icons Cache is rebuilt by Windows Explorer. However, only partially: It is better to restart the computer again for a complete rebuild of the Notification Area Icon Cache.
After this, the permant display for WinLED must be configured again, but Windows will remember it this time.
- Both the installation and uninstallation of the WinLED is canceled. What can I do?
Microsoft's Windows Installer saves a variety of information in the registry and in Windows system directories to enable later easy uninstallation. If there are irregularities there may be so-called deadlock situations: WinLED can neither be installed nor uninstalled. However, the WinLED as of version 1.3.0 uses an installer engine that allows them to get out of this situation in two steps:
- Please download the Windows Installer CleanUp Tool and start it on the affected system. Remove the WinLED installation from the list of all installations.
- Locate a file WinLEDInstaller.exe file in the directory "C:\ProgramData\Package Cache". If you find any file, delete it.
Now the installer of the current version of the WinLED should again offer a new installation of WinLED.
- The installation fails with the message 'The performance counter 'PhysicalDisk' could not be initialized successful on this computer.'. What can I do?
The PerformanceCounter 'PhysicalDisk' of Windows is installed or configured incorrectly. Please start a 'command shell' using elevated rights ('run as administrator') and go to the root directory of their system drive using the command 'cd C:\'. Next enter the command 'lodctr / r' and execute it. After the successful execution of the command in individual caseswas required a restart of the computer. Afterwards the successful installation of WinLED should be possible.
Some users were only successful after deleting the registry entry
'HKEY_LOCAL_MACHINE\SYSTEM\CurrentControlSet\Services\PerfProc\Performance\Disable Performance Counters', and afterwards the restart of the Windows service "Windows Management Instrumentation service".
- WinLED does not start and reports the error "There are no drives on this system for which performance monitoring is provided by Windows."
The PerformanceCounter 'PhysicalDisk' of Windows is installed or configured incorrectly. Please start a 'command shell' using elevated rights ('run as administrator') and go to the root directory of their system drive using the command 'cd C:\ '. Next enter the command 'lodctr / r' and execute it. After the successful execution of the command in individual cases was required a restart of the computer. Afterwards the successful start of WinLED should be possible.
Some users were only successful after deleting the registry entry
'HKEY_LOCAL_MACHINE\SYSTEM\CurrentControlSet\Services\PerfProc\Performance\Disable Performance Counters', and afterwards the restart of the Windows service "Windows Management Instrumentation service".
- WinLED does not recognize my SSD as a physical drive. What can I do?
There can be different reasons. The Windows operating system can manage different types of drives, but initializes the PhysicalDisk performance counter for physical drives only. It is possible that the driver of the manufacturer of the SSD does not provide the operating system with information for the PerformanceCounter, so that Windows does not initialize a PerformanceCounter for it. In that case, WinLED can not be used for this drive.
However, it is also possible that the SSD manufacturer or Microsoft marks the SSD as another type of drive that is not yet captured by WinLED. If you're using WinLED on a computer with an email program, you'll find a "Report a problem" button in the splash screen ("About WinLED"). This generates an e-mail form in which an overview of the setup of your computer is already inserted recognized by WinLED. Please send me this information by e-mail. If WinLED can be expanded to include more types of drives, I'm happy to release an update for WinLED.
- In context menu WinLED displays a drive multiple times. Why?
Probably there are stripesets on your Windows system. Stripesets are configuration settings in Windows' Disk Management that allow multiple physical drives to be interconnected into one logical drive. Despite the interconnection Windows creates a separate PerformanceCounter for each physical drive, which also is displayed separately in WinLED.
- During installation appears the message "Expired installer". What can I do?
Please always download and use the latest version of WinLED installer from my blog.
User Rating: / 2
- Details
-
Published on Sunday, 21 February 2016 09:52
-
Hits: 4798
|
From version 2 the DynDNS Service provides the download of the configuration directly from a web page. You can try it: If you are reading this page on a computer that has been installed DynDNS Service, you are able to click on the following demo link in order to download the configuration of a DynDNS provider with dummy values and add it to the configuration of the DynDNS Service
|
|
|
|
The successful import of the configuration of new DynDNS providers is displayed by a dialogue and subsequently there are new providers displayed in DynDNS Service by opening the configuration dialog of the DynDNS Service or updating the configuration (move right the slide switch down in the configuration dialog).
|
Configuring Your Own Web Link
The following instructions describe how you can set up your own link for automatic configuration of the DynDNS Service on a web page. For that you only need to place a link on their web page, as this example shows:
|
<a href="DynDNSService.WebConfig:[KeyValuePairs]">Descriptive text</a>
|
|
There are two different types of classes registrations for the DynDNS Service you can choice:
| Web Link
|
Description
|
| DynDNSService.WebConfig
|
Allows configuration for a provider by directly inserting the configuration data in HTML code. The advantage of this variant is the fact the DynDNS Service takes over the configation directly without needing to download more data from the Internet. Disadvantage is that all data (incl. password) are loaded from the user's Web browser and partly also can be displayed (for example, in tooltips etc.).
|
| DynDNSService.XmlConfig
|
Allows configuration for any number of providers by downloading an XML-based configuration file from the specified source in the hyperlink. The advantage here is that sensitive user data downloaded only after the user clicks the hyperlink. Disadvantage is that the Download from DynDNS Service itself (not the web browser) is performing the download.
|
Both types differ only in the content of the attribute href in the HTML hyperlink element and are described in more detail below:
|
Configuring a direct web links
The attribute href is composed, divided by a colon ":", by a fixed part "DynDNSService.WebConfig", which marks the web link as a direct web link and by a variable part <KeyValuePairs>, of a through pipe symbol "|" separate parameter describes which evaluates the DynDNS Service for automatic configuration. The following example shows the contents of the demo links above:
|
<a href="DynDNSService.WebConfig:ProviderName=DynDNS%20Provider|Enabled=True|DomainName=mydomain.contoso.com|Keywords=good,nochg|UpdateUrl=https://www.contoso.com/nic/update?hostname=[DOMAINNAME]&myip=[IPV6]|UpdateTimeout=3|UserName=DynDNSUsername|Password=top_secrect">DynDNS Service - Auto Web Configuration Test</a>
|
Description of Parameters
The following table shows all available parameters for the configuration of a provider:
| Parameter
|
Type
|
Description
|
| ProviderName
|
Text
|
Freely selectable name of the provider
|
| Enabled
|
True or False
|
Determines whether the provider immediately is active after configuration or has to be manually activated by the user.
|
| DomainName
|
Text
|
Specifies the Domain Name for configuration.
|
| UpdateUrl
|
Text
|
Sets the update url, to be used for the DynDNS updates.
|
| UpdateTimeout
|
Integer
|
Specify the timeout in seconds that should apply during a DynDNS updates.
|
| Keywords
|
Comma Separated Text
|
Determines which keywords in the response of the DynDNS provider signal the successful update.
|
| UserName
|
Text
|
Specifies the user to be used for authentication of the DynDNS updates.
|
| Password
|
Text
|
Specifies the password that must be used for authentication of the DynDNS updates.
|
|
Configuration via an XML-based configuration file
The following instructions describe how you can set up your own link for automatic configuration of the DynDNS Service from an XML-based configuration file on a web page. For that you only need to place a link on their web page, as this example shows:
|
<a href="DynDNSService.XmlConfig:http://www.contoso.com/MyXmlConfiguration.xml">DynDNS Service - Xml Auto Configuration Test</a>
|
Description of Parameters
The following example demonstrates the structure of the XML-based configuration file using a configuration of 2 different providers:
|
<?xml version="1.0" encoding="utf-8"?>
<DynDNSService>
<Providers>
<Provider>
<Name>Test Item 1</Name>
<IsEnabled>True</IsEnabled>
<Url>http://dyndns.contoso.com/nic/update?hostname=[DOMAINNAME]&myip=[IPV6]</Url>
<Timeout>3</Timeout>
<UserName>BarackObama</UserName>
<Password>top_secrect</Password>
<Authentication>RW5jcnlwdGVkIEtleQ==</Authentication>
<Keywords>good,nochg</Keywords>
<DomainName>www.contoso.com</DomainName>
</Provider>
<Provider>
<Name>Test Item 2</Name>
<IsEnabled>False</IsEnabled>
<Url>https://dyndns.contoso.com?fqdn=[DOMAINNAME]&ipv4=[IPV4]&ipv6=[IP4mapped]&forcehost=1&authtype=secure&token=[USERNAME]</Url>
<Timeout>10</Timeout>
<UserName>BillGates</UserName>
<Password />
<Authentication />
<Keywords>success</Keywords>
<DomainName>webcam.contoso.com</DomainName>
</Provider>
</Providers>
</DynDNSService>
|
Description of Parameters
The following table shows all available parameters for the configuration file:
| Parameter
|
Type
|
Description
|
| ProviderName
|
Text
|
Freely selectable name of the provider
|
| IsEnabled
|
True or False
|
Determines whether the provider immediately is active after configuration or has to be manually activated by the user.
|
| DomainName
|
Text
|
Specifies the Domain Name for configuration.
|
| Url
|
Text
|
Sets the update url, to be used for the DynDNS updates.
|
| Timeout
|
Integer
|
Specify the timeout in seconds that should apply during a DynDNS updates.
|
| Keywords
|
Comma Separated Text
|
Determines which keywords in the response of the DynDNS provider signal the successful update.
|
| UserName
|
Text
|
Specifies the user to be used for authentication of the DynDNS updates.
|
| Password
|
Text
|
Specifies the password that must be used for authentication of the DynDNS updates.
|
Authentication
|
Text
|
Freely selectable string used to authenticate a DynDNS updates.
|
|
Authentication Parameter
The authentication parameter is a specific parameter that can be used to authenticate a DynDNS update. The parameter can not be viewed or edited by the user via the user interface. During each DynDNS update, performed by DynDNS Service, the content of the imported authentication parameter will be added as an additional header parameter 'Authentication' in addition to the header parameter 'Authorization':
				Authorization Basic QmFyYWNrT2JhbWE6dG9wX3NlY3JlY3Q=
				Authentication RW5jcnlwdGVkIEtleQ==
|
Remarks
You can create an XML configuration file also from the already configured DynDNS providers of DynDNS Service. Just go to the Windows notification area in the context menu of the DynDNS Service and select the menu item "Export". In the subsequently appearing dialog "Save File" select the XML file format.
If you want to create an XML-based configuration file itself, please consider to apply the XML file format syntax and semantics. The use of markup characters in the content of an XML tag, such as "<", ">" or "&" would lead to the termination of the import and output an error message by the DynDNS Service. Instead, you should work with HTML code, such as "<", ">" or "&"" for the examples above. Apart from the parameters for the password and authentication, the DynDNS Service translates all common HTML codes in all parameters, if these are used in the XML file.
|
User Rating: / 1
- Details
-
Published on Saturday, 30 January 2016 15:02
-
Hits: 4897
{jcomments off}Developed by me the DynDNS Service is quite popular and is often used to configure the DynDNS updates, but sometime I'm contacted to help for a solution of configuration problems.
But there is a problem: It is very difficult for me to identify and to properly classify problems, that occur on a remote computer and its configuration to which I don't have access. Often it is then also the DynDNS update of lesser known DynDNS providers, of which I can not possibly know all. To be able to help in such cases I have to learn more of the affected system and there is the next problem: Many users who contact me, then know partially nothing with my terminology and instructions to begin - It's just not everyone so enthusiastic about the technology, as I am.
That's why I have the DynDNS Service - Support Tool developed which is part of each DynDNS Service Installation. The SupportTool works quite simple: It collects all relevant information for me on a computer system and allows the user to store the collected information in a ZIP file. This information can be sent as an attachment to me then, so I have a faster and better chance to see what problems occurred on the affected system.
In the following guide you will learn how to proceed step by step to generate a support file with the SupportTool:
Step 1 - Opening the DynDNS Service - Configuration dialog
Please open the DynDNS Service - configuration dialog by double-clicking the DynDNS Service - icon in the system tray of Windows (usually the bottom right of the Windows taskbar):

After the double click on the DynDNS Service icon in the system tray, the DynDNS Service opens its configuration dialog:
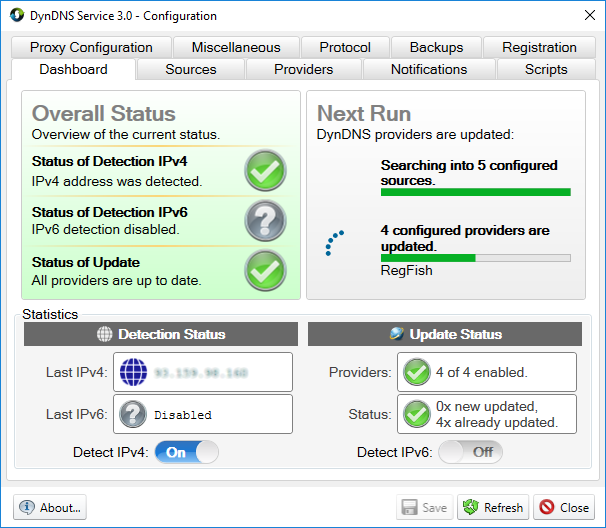
Please make sure that the DynDNS configuration dialog in Windows has the focus, so all keyboard and mouse inputs from Windows will be forwarded to this dialog. Please then enter the keyboard's key combination <Ctrl-F11>.
|
Step 2 - Gather relevant information
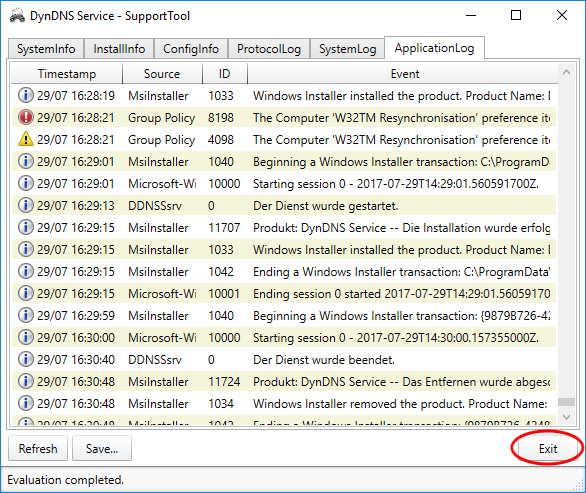
Now the SupportTool is started and it immediately is collecting all relevant information on the affected computer system:
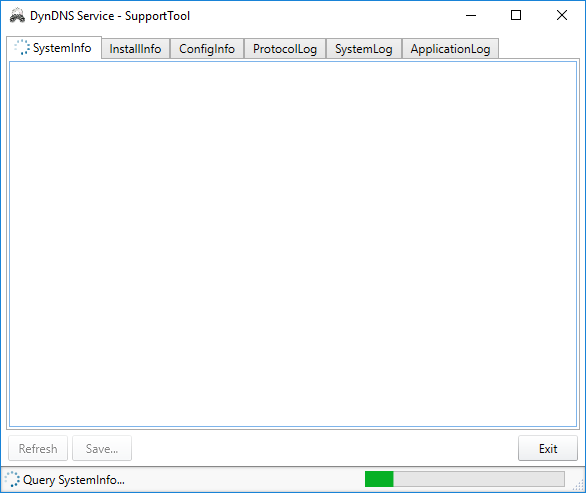
Please wait until the Support Tool has completed the collection of information. You can recognize the progress of collection by the progress bar on the right lower corner of the SupportTool. After completion of collection, you can view in the different tabs, which data has collected the SupportTool:
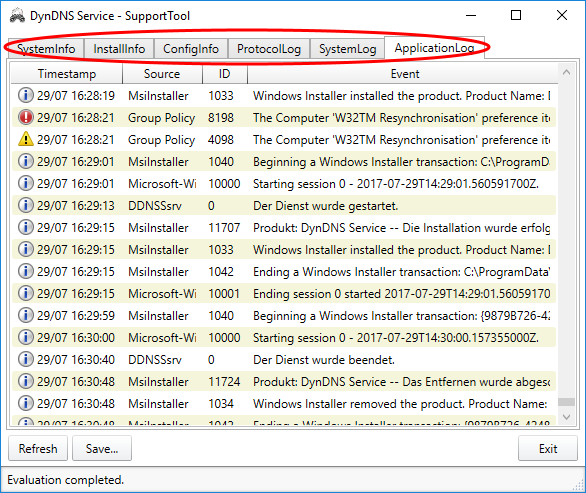
The SupportTool does not collect and store any passwords or other sensitive information. I don't need it for the error analysis.
|
Step 3 - Save the support file
Please save the collected information in a support file via the button "Save ...":
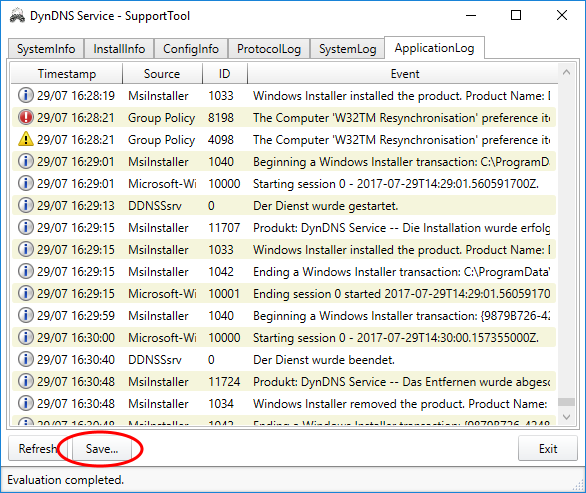
This opens a Windows-typical dialog "Save File ...":
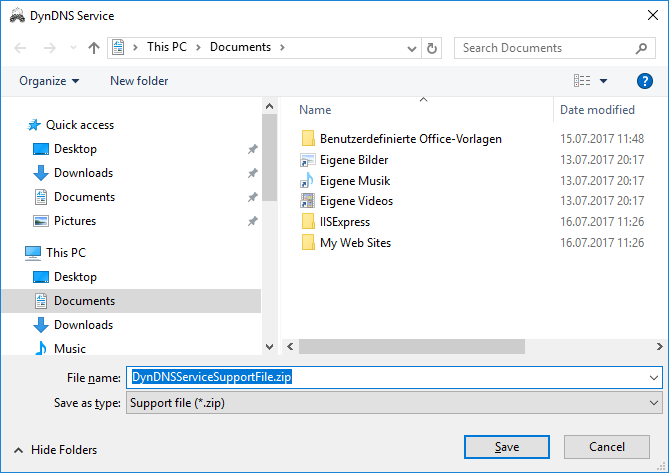
Save the support file to a location of your choice. The support file is a normal ZIP file in which contains all collected informationas unencrypted files. If you like, you can also see the usual zip tools once the contents of the support file and possibly remove individual information, if you do not want this information to be transmitted to me.
After saving the SupportTool can be exited:
|
Step 4 - Send the support file
Please add the stored support file as an attachment to an e-mail which you sent to the following address:

Please describe in the email, the problem encountered and the steps that had been taken to this program.
|
Legal Notice
For most people seeking help these notes are unnecessary, but there are sometimes misunderstandings, which can lead to expectations, which I then can not do justice. Therefore, I have here collected some legal information which you should consider when their support request to me:
This advanced support from me for the DynDNS Service is a free service, because I want to help users of the DynDNS Service, but also to further improve the tool DynDNS Service. Therefore your personal data will only be used for problem solving and then is deleted. Exceptions are statistically derived and anonymous knowledge that I can use for further improvement of the DynDNS Service.
No legal claims are arising by sending of any kind of support file or my support answers and no contracts.
If you do not agree with these legal notices, I recommend you to renounce on support requests.
|
User Rating: / 1
- Details
-
Published on Saturday, 30 January 2016 18:57
-
Hits: 4753
{jcomments off}Do you have questions about the tool DynDNS Service? On this page you will get helpful answers to frequently asked questions.
- The DynDNS Service reports 'IP address missing' even though the IPv4 address has been detected. Why?
Starting from version 2.1.1 the detection of IPv4 and IPv6 addresses is enabled by default and the IPv6 address has been missed. If you want to configure DynDNS Service to detect IPv4 or IPv6 addresses only, please deactivate the corresponding option "Detect IPv4" or "Detect IPv6" in the tab "Sources" of the configuration dialog of the DynDNS Service.
- The configured timeout is reached for all active internet url sources. Why?
Possibly the DynDNS Service takes no direct connection to the Internet, but must accept the connection through a proxy and the proxy has not been activated and / or configured in the DynDNS Service. In the "Miscellaneous" you can customize the settings of a proxy.
- The DynDNS Update always runs in a timeout, although the detection of IP addresses works from the Internet. Why?
If the DynDNS Service be able to connect to the Internet through a proxy, you must activate the use of the proxy in the settings for each DynDNS provider separately. Change to the edit mode of the desired provider. Under the tab 'Provider' you can activate use of the proxy.
- Why the existing IP address of my network adapter is not recognized?
The detection of IP addresses from network adapter assumes that the system is directly connected to the Internet and the network adapter has assigned a public IP address. The DynDNS Service accepted IP addresses of network adapters only if it is not a private IP address.
- Is there a detailed help file for the DynDNS Service?
A classic Help function, there is only the DynDNS Service, version 1. As of version 2, the tooltip function is advanced so that you targeted assistance to almost every element in the dialogues of the DynDNS Service obtained by moving the mouse on an element.
- The system tray icon of the DynDNS Service is no longer displayed. Why?
A common reason is that Windows after some time hides the icons of rarely used applications in the notification area. However, this does not affect the operation of the DynDNS Service: Once a notification by the DynDNS Service is issued, Windows shows hidden icons temporarily again, so that the notification can not be lost. If you still want to keep their DynDNS status at a glance, you will learn in this guide from Microsoft on how to configure Windows so that all icons from Windows are displayed again.
- The DynDNS Service Icon is always hidden in the notification area, even though a permanent display has been configured in Windows. Why?
Windows has stored several registries of DynDNS Service in the notification area's cache and has not used the registration of DynDNS Service, which had changed to permanent settings. You can see this in the system control under "Notification Area Icons". If there several entries of DynDNS Service are displayed, these are duplicate registrations of DynDNS Service.
You can use this small batch program to refresh the Notification Icon Cache on the affected computer. The batch program first kills all Windows Explorer instances (the Windows taskbar disappears), then deletes the cache in the registry and restarts Windows Explorer (the tasklist appears again). With start, the Notification Area Icons Cache is rebuilt by Windows Explorer. However, only partially: It is better to restart the computer again for a complete rebuild of the Notification Area Icon Cache.
After this, the permant display for DynDNS Service must be configured again, but Windows will remember it this time.
- Both the installation and uninstallation of the DynDNS Service is canceled. What can I do?
Microsoft's Windows Installer saves a variety of information in the registry and in Windows system directories to enable later easy uninstallation. If there are irregularities there may be so-called deadlock situations: The DynDNS Service can neither be installed nor uninstalled. However, the DynDNS Service as of version 2.0.2 uses an installer engine that allows them to get out of this situation in three steps:
- Please download the Windows Installer CleanUp Tool and start it on the affected system. Remove the DynDNS Service installation from the list of all installations.
- Locate a file DynDNSServiceInstaller.exe file in the directory "C:\ProgramData\Package Cache". If you find any file, delete it.
- Call "Local Services" and stop Windows service "DynDNS Service".
Now the installer of the current version of the DynDNS Service should again offer a new installation of DynDNS Service.
- Why is the DynDNS Service Icon not displayed in the SystemTray after installation?
In particular, Windows 10 sometimes rejects the appearance of the icon in the SystemTray, without giving reasons for it. However, the display of the DynDNS Service icon will work again after a restart of the operating system.
- DynDNS updates always run out of time using provider spDYN. Why?
The provider announces in the header of its reply that the answer itself would be formatted in HTML (Content-Type: text/html), but then transmits the response as plain text plain without HTML format. Because the announced answer is missing, the DynDNS Service will not abort until time out; however, searches the plain text data sent so far for a valid response, so that the function remains basically guaranteed.
If you miss an answer to your question, please contact me. Please follow these instructions.
|
|
|
|
")


